
Felting instructions by Nancy Ballesteros
Silk hankies traditionally have been underutilised as a source of silk by felt makers. Generally people are not sure how to tackle handling them. In the following instructions we will attempt to de-mystify the hanky, and inspire you with a couple of simple scarf instructions.[accordion][toggle title=”Playing around with Silk Hankies”]
What’s so special about silk hankies? Each silk hanky is made from a degummed cocoon. The caterpillars spin each cocoon as one long continuous strand of silk which is then opened out and stretched over a square wooden frame (resembling the shape of a handkerchief). One cocoon is as gossamer as a spider’s web. I generally never use just one hanky as it would easily get lost in the wool. If you look at the edge of the hankies, each thick edge is one cocoon (see Figure 1). Layer upon layer has been stacked on top of one another.
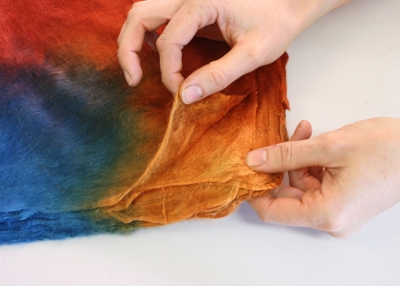
Figure 1
For general felting purposes pull away several layers at a time – it is quite hard to count the layers (so don’t), simply pull off just enough so you can still see through to your hand. It will be MUCH easier to work with the hankies if you iron them before and after splitting off layers. Different visual/textural effects can be achieved by using slightly more or slightly less, play around to see what you prefer.
Remember SILK HAS NO FELTING PROPERTIES; therefore, you must always use wool with it to act as the “glue”. When used in conjunction with fine silk fabrics it doesn’t really matter in which order you lay down the silk hanky, the wool and the fabric. The wool will generally always be able to work its way through to felt the silk hanky. Hankies seem to always have thick and thin areas. It’s a good idea to add extra wool to the underneath edges of the hankies since this is usually a thicker area. Try to thin out any other thick areas of the hankies or be sure and add extra wool. A word of warning, if you use too many hankies the silk will be too thick for the wool to penetrate and it will not felt properly. Remember shrinkage is a big part of the felting process; the silk hankies will become denser when felted.
It is important to decide which colour of wool to place behind the hankies. A very different effect is achieved using a contrasting colour of wool to the hankies verses using the same colour. Experiment to see what look you prefer. Personally I use a strong contrast between the wool and the hankies resulting in a lovely marbling effect – if you felt your scarf enough. The hankies need to be well felted or else they will pull away from the scarf.

Marbeling Effect
It is extremely important to felt your hankies well. I recommend that you let your scarf rest overnight after the initial felting and felt it again the next day. The wool needs to completely penetrate all layers of the silk to keep it in place.
Consider your overall design. The wool can just be laid underneath where the hankies are placed OR the wool can be laid over the entire fabric and the hankies placed anywhere on top of the wool. Personally I like to leave gaps so that I can see through to the fabric in places. Be sure and be very light handed with the wool, it won’t take much (roughly 10gms (.35 ounce)) per scarf – for those without scales that is about ½ metre of wool tops. Laying the fibres only in one direction is fine OR you can lay a light cross-layer to help shrink the scarf in both directions.
Iron, iron, iron – if you are feeling frustrated by the hankies catching on everything, or they just look a bit messy – IRON THEM! You can also try a bit of talcum powder on your hands to help stop the hankies from catching on any rough spots. Thin disposable gloves are also an option.[/toggle][toggle title=”Design Options for Silk Hankies”]
Working with Square Shapes
Hankies are easy to felt in a square shape. Peel off enough so you can just see through the hankies to your hand (see Figure 2). It will be MUCH easier to work with the hankies if you iron them before and after splitting off the layers. Next lay a fine layer of wool directly on the back of the hanky squares in two directions (see Figure 3) making sure to cover underneath the edge of the hankies with an extra small amount of wool. Gently place the hanky onto your fabric – wool side facing the fabric (hanky, wool, fabric).
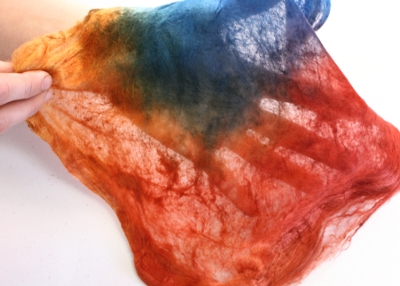
Figure 2
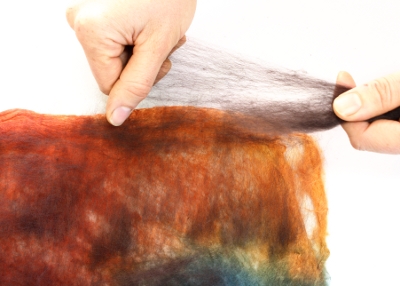
Figure 3
Working with Flower shapes
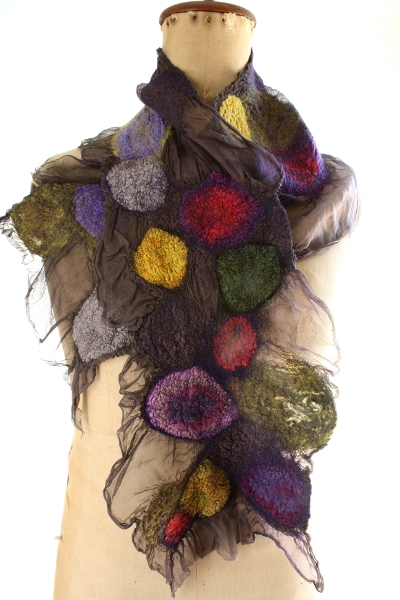
Flower shapes can be achieved by holding the hanky in its centre and placing them in an artistic manner on top of the fabric, be sure not to forget to add some wool either under the flower or on the backside of the fabric. Stamens and leaves can be designed from wool to help define the flower (see Figure 4).
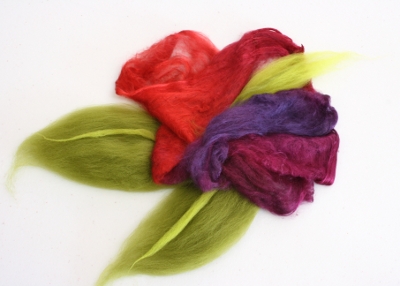
Figure 4
Working with Abstract Shapes
Another design technique for the hankies that will utilise any left over bits and pieces is to simply place any odd left over hankies on the ironing board and iron them flat. Great abstract shapes will appear (see Figure 5). Once again you can lay wool directly on the back of these shapes then place these on top of your fabric. Alternatively you can place the hanky shapes directly on top of the fabric then turning over the fabric to lay the wool on its backside.

Figure 5
Working with Spiral Shapes
To create a spiral, begin by peeling off a very thin layer of hanky and pushing your fingers through its centre (where ever it is thinnest) then gently stretching it out into a large circle (see Figure 6). Because the hankies are one long strand of silk it won’t break very easily, just keep stretching and thinning till the desired effect is reached. The silk can then be pulled further apart and broken to create one long strand. To make the spirla shapes start wrapping the strand around in a spiral-like manner, be careful not to crowd the silk in the centre of the spiral too much, it will fill in during the felting process (see Figure 7).

Figure 6
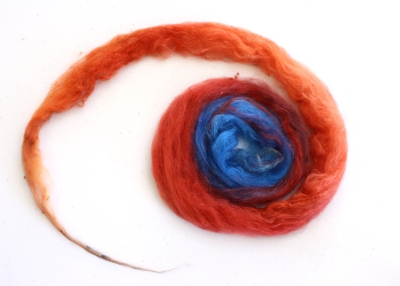
Figure 7
Working with Linear Shapes
For linear shapes start in the same manner as with circular shapes, putting your fingers through the centre of the hankies and stretching it out into a large circle. For the lines in the scarf I like to continue pulling the circle into an oval shape (not breaking the strand). Place the oval down and bring the two sides together to form one solid looking strand. Stretch lengthwise as much as needed to obtain the desired width. Wool can be put directly onto the back of each hanky strand (see Figure 8) OR alternatively onto the fabric in the location where the hanky will be placed. If you would like the linear shape to be more defined, iron first before laying any wool on it.

Figure 8 [/toggle][toggle title=”Material Requirements”]
Scarf with Squares – Option A
Tissue Silk Fabric: 2.5 metres (2.7 yards) X approximately 28 cm wide (11 inches). The fabric should be just slightly wider than the hankies. The finished length of the scarf is approximately 1.7 metres (1.9 yard) X 20 cm (7.8 inches).
Superfine Merino Wool Tops: 10 -15 gms (.35 – .53 ounces). The wool can be a contrasting colour to the silk hankies, the same colour as the silk hankies, or the same colour as the tissue silk – your choice.
Silk Hankies: 40gms (1.4 ounces). Use several different colours of hankies or all the same colour – your choice.
Scarf with Spirals – Option B
Tissue Silk Fabric: 2.25 metres (2.4 yards) X 35cm wide (14 inches). The finished length of the scarf is approximately 1.2 metres (1.3 yards) X 20cm (7.8 inches).
Superfine Merino Wool Tops: 10 -15 gms (.35 – .53 ounces). The wool can be a contrasting colour to the silk hankies, the same colour as the silk hankies, or the same colour as the tissue silk – your choice.
Silk Hankies: 20 gms (.7 ounces). Use several different colours of hankies or all the same colour – your choice.
Scarf with Lines – Option C
Tissue Silk Fabric: 2.5 metres (2.7 yards) X 35 cm wide (14 inches). The finished length of the scarf is approximately 1.7 metres (1.9 yard) X 20 cm (7.8 inches).
Superfine Merino Wool TopS: 10 -15 gms (.35 – .53 ounces). The wool can be a contrasting colour to the silk hankies, the same colour as the silk hankies, or the same colour as the tissue silk – your choice.
Silk Hankies: 30-40 gms (1 – 1.4 ounces). Use several different colours of hankies or all the same colour – your choice.
General Requirements
Bubble Wrap: longer and wider than the scarf you will be making
2 PVC Poles or Pool Noodles: as wide as the bubble wrap
2 Painters Plastic Drop Sheets: the same size as bubble wrap
Non-Slip Matt: to put under project when rolling so it won’t slide around
Watering Jug (or old milk bottle): with small holes in the lid for wetting out your project
Plastic Painter’s Tray (see Figure 14), glass washboard, or hard pool bubble wrap: for fulling your work
Iron
Grease proof paper
Olive Oil Soap
Old towels
If you need a more detailed set of basic felting instructions please see our website athttps://www.treetopscolours.com.au/more-felting-info-and-supplies/wool-felting-how-to/no-roll-felt-scarf.html [/toggle][toggle title=”Directions for Felting Scarf with Squares Option A”]
Place the bubble wrap on top of your table, bubble side down. Next place one piece of painter’s plastic on top of the bubble wrap and then lay down your fabric on top of painters plastic. I usually sandwich my work inside two sheets of painter plastic allowing me to easily flip it and design on both sides of the scarf. I believe scarves look better if both sides have been thought about.
Fold the ends of your fabric back up onto itself 15cm (or however much you desire), iron to keep in place (seeFigure 9). This will create a gorgeous folded edge along the bottom of your scarf and at the same time create more weight for better drape.
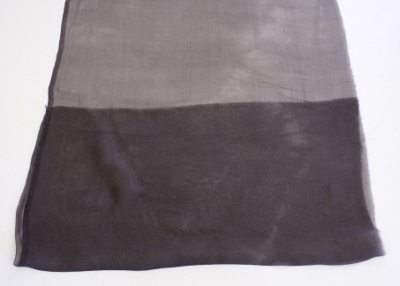
Figure 9
Next, peel off enough hanky layers just so you can just see through to your hand (see Figure 10). If they get a bit fluffy or disorganized in the process, simply give them a quick iron to put things back in place. Now lay a fine amount of wool directly on the back of the squares in two directions (see Figure 11), making sure to cover the edge of the hankies with an extra small amount of wool. Pat down gently and transfer onto your fabric – wool side facing the fabric (hanky, wool, fabric). Remember there will be another hanky directly behind this one on the other side of the fabric so don’t use too much wool. When placing the first hanky down on the fabric make sure it covers the raw edge which was folded up when creating the bottom edge of the scarf.
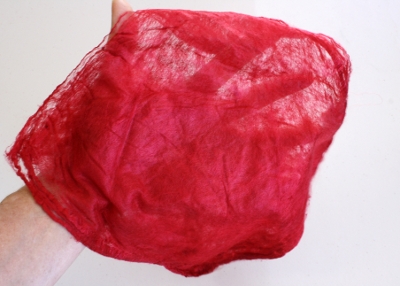
Figure 10

Figure 11
Continue placing more hanky squares along the length of the scarf leaving a 3- 5 cm (1.2 inch – 2 inch) gap between hankies. Essentially you just need to evenly space the hankies out along the length of the scarf, leaving gaps between the hankies (see Figure 12). Adjusting the length of the fabric if need be.

Figure 12
When you are finished laying the shapes on the front side of the fabric, cover scarf with another layer of painters plastic. Role the two layers of painter’s plastic with the scarf sandwiched in the middle up around your pvc pipe. Flip the role and then un-roll so the bottom side of the fabric is now facing up (see Figure 13), remove the top layer of painter’s plastic and finish designing the backside of the scarf by repeating the previous steps. Matching up the squares with those on the front side.
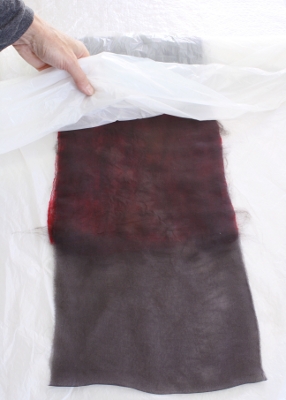
Figure 13
When your design work is finished, the next step is to sprinkle it with soapy water. I use an old milk bottle which has been made into a water can by pocking a hot needle into the cap many times. Grate a couple of tablespoons of olive oil soap into a jug, add boiling water to melt, top up with cold water and pour into your milk bottle. Now sprinkle soapy mixture over the scarf. I don’t bother rubbing it in or using netting, the water will disperse well enough when you start rolling. You can either cover your wet scarf with the painters plastic or simply leave it off and roll up the scarf in the bubble wrap around the pvc pipe. Lastly, roll this bundle in an old towel to catch any drips and place on top of your non-slip matt to begin the rolling phase.
The felting process is divided into two stages – hardening (rolling) and fulling (tossing and washboard). I generally roll my scarves for around 20-30 minutes (approximately a 1000 roles or more), continually changing ends from which I roll and occasionally adding more water as needed to keep the work moist. If you don’t like to roll try using thetumble dryer to do the rolling part for you. Full instructions are on my website No Roll Felt Scarfhttps://www.treetopscolours.com.au/more-felting-info-and-supplies/wool-felting-how-to/no-roll-felt-scarf.html.
When the silk hankies begin to show signs of bonding to the fabric (either by seeing wool fibres penetrating through the silk hankies, or if pinched it doesn’t’ move around too much, and possibly some shrinkage has begun) you can take the scarf out of the plastic and start the gentle process of tossing. As you proceed to toss, continually add water and soap. Stop frequently to check that your edges haven’t folded in on themselves. Also begin to stretch your work, gently at first and then more strongly as the wool becomes more felted, this will help to create a better felt.
When you feel your scarf is nearly finished, complete the fulling stage by using a double-cut glass washboard, firm pool bubble wrap or my latest favourite tool a plastic paint roller tray (see Figure 14). The ridges are quite good for fulling as long as you use plenty of warm water and olive oil soap. You should feel as if the scarf is “gliding” across the ridges, not scrubbing. Work on this surface till the felt feels firm and the scarf has shrunk at least 30%.

Figure 14
Finally, rinse out all the soap in similar temperature water, don’t shock the wool. Roll your scarf in a towel to remove excess moisture then lay flat to dry, stretching to shape as needed.
After the scarf has been dry for at least 24 hours, I always feel the need to felt it again for about 5 minutes using the washboard or painters tray. I find after the wool has dried, the fibres appear to be more relaxed. What feels really well felted when wet, tends to be less felted when dry. The re-felting process will proceed amazingly quickly.
It is extremely important to felt your hankies well. The wool needs to completely penetrate all layers of the silk to keep it in place. If you have used a strong contrast between the wool and the hankies it will result in a lovely crackling effect.
As a last finishing touch steam iron your scarf to add a more professional look along with bringing up the lustre of the silk.[/toggle][toggle title=”Directions for Felting Scarf with Spirals Option B”]
Place the bubble wrap on top of your table, bubble side down. Next place one piece of painter’s plastic on top of the bubble wrap and then lay down your fabric on top of painters plastic. I usually sandwich my work inside two sheets of painter plastic allowing me to easily flip it and design on both sides of the scarf. I believe scarves look better if both sides have been thought about.
To create the spiral shapes begin by gently peeling of a very thin layer of hanky, push your fingers through its centre (where ever it is thinnest) and start stretching it out into a large circle (see Figure 15). Because the hankies are basically one long strand of silk it won’t break very easily, just keep stretching and thinning till the desired thickness is reached. The silk can then be pulled further apart and broken to create one long strand. Working on a sheet of grease proof paper on the ironing board start wrapping the strand around in a spiral-like manner, being careful not to crowd the silk in the centre of the spiral too much, it will fill in during the felting process (see Figure 16). If you would like your shapes to be a bit more perfect and predictable, iron the circles before you lay the wool onto them. Otherwise more of an organic effect will happen when you just pat the silk spiral down with your hands and then lay the wool onto the spiral (see Figure 17). The wool can be laid onto the shapes in many ways – crosswise, circular, randomly, any which way will work, each giving a slightly different effect. Don’t be afraid to tear the wool fibres into shorter pieces with your fingers to make it fit the shapes better (never cut the wool with scissors). Remember the direction the wool is laid is the main direction in which the shrinkage will occur. Interesting effects can be achieved by using a variety of wool colours behind the spirals. Also vary the size of your spirals by tearing off pieces from the long strand.
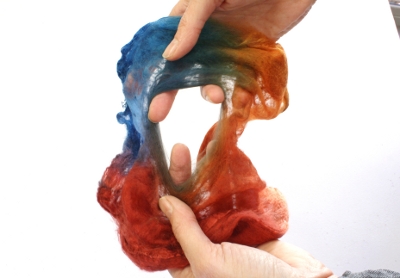
Figure 15

Figure 16
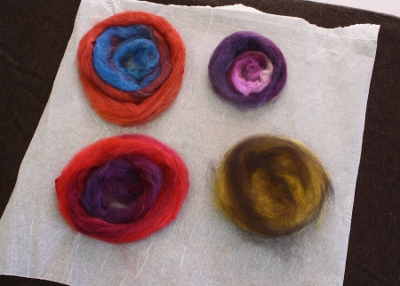
Figure 17
If the spiral is to be placed only on one side of the scarf, use a bit extra wool to hold it in place. If there is to be another spiral positioned on top of it on the backside of the scarf use a little less wool.
Now start placing your shapes (wool side against the fabric) onto the fabric in a random manner, don’t forget that more shapes will be placed on the backside of the fabric, so leave room for the other side to show through (seeFigure 18).
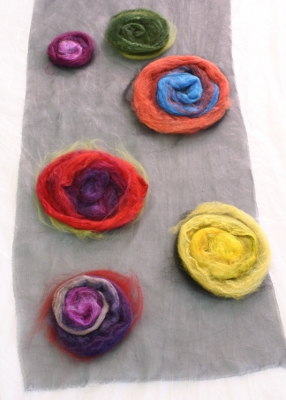
Figure 18
When you are finished laying the shapes on the front side of the fabric, cover scarf with another layer of painters plastic. Roll the two layers of painter’s plastic with the scarf sandwiched in the middle up around your pvc pipe. Flip the role and then un-roll so the bottom side of the fabric is now facing up (see Figure 19), remove the top layer of painter’s plastic and finish designing the backside of the scarf by repeating the previous steps for making spiral shapes and laying them randomly in the spaces left (see Figure 20).

Figure 19

Figure 20
When your design work is finished, the next step is to sprinkle it with soapy water. I use an old milk jug which has been made into a water can by pocking a hot needle into the cap many times. Grate a couple of tablespoons of olive oil soap into a bottle, add boiling water to melt, top up with cold water and pour into your milk bottle. Now sprinkle soapy mixture over the scarf. I don’t bother rubbing it in or using netting, the water will disperse well enough when you start rolling. You can either cover your wet scarf with the painters plastic or simply leave it off and roll up the scarf in the bubble wrap around the pvc pipe. Lastly, role this bundle in an old towel to catch any drips and place on top of your non-slip matt to begin the rolling phase.
The felting process is divided into two stages – hardening (rolling) and fulling (tossing and washboard). I generally roll my scarves for around 20-30 minutes (approximately a 1000 rolls or more), continually changing ends from which I roll and occasionally adding more water as needed to keep the work moist. If you don’t like to roll try using the tumble dryer to do the rolling part for you. Full instructions are on my website No Roll Felt Scarfhttps://www.treetopscolours.com.au/more-felting-info-and-supplies/wool-felting-how-to/no-roll-felt-scarf.html.
When the silk hankies begin to show signs of bonding to the fabric (either by seeing wool fibres penetrating through the silk hankies, or if pinched it doesn’t’ move around too much, and possibly some shrinkage has begun) you can take the scarf out of the plastic and start the gentle process of tossing. As you proceed to toss, continually add water and soap. Stop frequently to check that your edges haven’t folded in on themselves. Also begin to stretch your work, gently at first and then more strongly as the wool becomes more felted, this will help to create a better felt.
When you feel your scarf is nearly finished, complete the fulling stage by using a double-cut glass washboard, firm pool bubble wrap or my latest favourite tool a plastic paint roller tray (see Figure 21). The ridges are quite good for fulling as long as you use plenty of warm water and olive oil soap. You should feel as if the scarf is “gliding” across the ridges, not scrubbing. Work on this surface till the felt feels firm and the scarf has shrunk at least 30%.

Figure 21
Finally, rinse out all the soap in similar temperature water, don’t shock the wool. Roll your scarf in a towel to remove excess moisture then lay flat to dry, stretching to shape as needed.
After the scarf has been dry for at least 24 hours, I always feel the need to felt it again for about 5 minutes using the washboard or painters tray. I find after the wool has dried, the fibres appear to be more relaxed. What feels really well felted when wet, tends to be less felted when dry. The re-felting process will proceed amazingly quickly.
It is extremely important to felt your hankies well. The wool needs to completely penetrate all layers of the silk to keep it in place. If you have used a strong contrast between the wool and the hankies it will result in a lovely crackling effect.
As a last finishing touch steam iron your scarf to add a more professional look along with bringing up the lustre of the silk.[/toggle][toggle title=”Directions for Felting Scarf with Lines Option C”]
Place the bubble wrap on top of your table, bubble side down. Next place one piece of painter’s plastic on top of the bubble wrap and then lay down your fabric on top of painters plastic. I usually sandwich my work inside two sheets of painter plastic allowing me to easily flip it and design on both sides of the scarf. I believe scarves look better if both sides have been thought about.
Fold the ends of your fabric back up onto itself 20cm (or however much you desire), iron to keep in place (see Figure 22). This will create a gorgeous folded edge along the bottom of your scarf and at the same time create more weight for better drape.
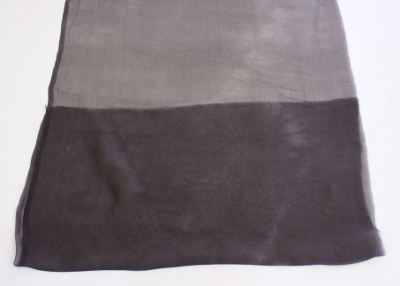
Figure 22
To create the linear shapes begin by gently peeling off a thin layer of hankies, push your fingers through its centre (where ever it is thinnest) and start stretching it out into a large circle (see Figure 23). Because the hankies are basically one long strand of silk it won’t break very easily, just keep stretching and thinning till the desired thickness is reached. For the lines in the scarf I like to continue pulling the circle into an oval shape (not breaking the strand). Place the oval down and bring the two sides together to form one solid looking strand. Stretch lengthwise as much as needed to obtain the desired width. I suggest varying the length and width of these strands to create a more visual interesting scarf.

Figure 23
Now lay a fine amount of wool directly on the back of the strands (see Figure 24). I generally lay the wool only in the lengthwise direction, with some crosswise pieces particularly at the ends of the strands. Pat the wool down gently and flip onto your fabric – wool side facing the fabric (hanky, wool, fabric). Remember there will be hanky strands on the other side of the fabric so don’t use too much wool. When placing the first strands onto the fabric make sure they cover the raw edge of the fabric that was folded up. Continue placing more strands along the entire length of the scarf, randomly leaving some gaps between them (see Figure 25, Figure 26 – the red is the wool fibre). Add extra wool along the bottom edges of the silk strands as needed, remembering to tear the wool into shorter pieces for a better fit.
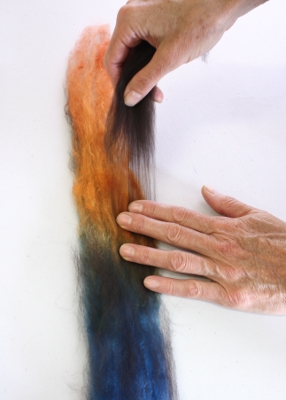
Figure 24

Figure 25

Figure 26
When you are finished laying down the strands on the front side of the fabric, cover scarf with another layer of painters plastic. Roll the two layers of painter’s plastic with the scarf sandwiched in the middle up around your pvc pipe. Flip the role and then un-roll so the bottom side of the fabric is now facing up, remove the top layer of painter’s plastic and finish designing the backside of the scarf by repeating the previous steps. Try matching up the strands with those on the front side but don’t worry too much if it’s not exact, leaving gaps has a nice effect (see Figure 27).
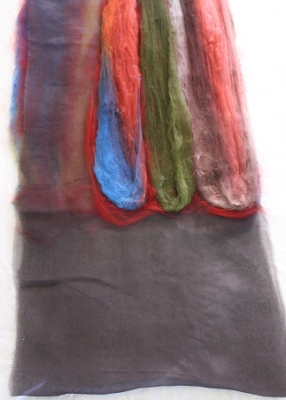
Figure 27
If a line ends up being placed only on one side of the scarf, use a bit extra wool to hold it in place. If there is to be another line positioned on top of it on the backside of the scarf use a little less wool.
When your design work is finished, the next step is to sprinkle it with soapy water. I use an old milk bottle which has been made into a water can by pocking a hot needle into the cap many times. Grate a couple of tablespoons of olive oil soap into a jug, add boiling water to melt, top up with cold water and pour into your milk bottle. Now sprinkle soapy mixture over the scarf. I don’t bother rubbing it in or using netting, the water will disperse well enough when you start rolling. You can either cover your wet scarf with the painters plastic or simply leave it off and roll up the scarf in the bubble wrap around the pvc pipe. Lastly, roll this bundle in an old towel to catch any drips and place on top of your non-slip matt to begin the rolling phase.
The felting process is divided into two stages – hardening (rolling) and fulling (tossing and washboard). I generally role my scarves for around 20-30 minutes (approximately a 1000 roles or more), continually changing ends from which I roll and occasionally adding more water as needed to keep the work moist. If you don’t like to roll try using the tumble dryer to do the rolling part for you. Full instructions are on my website No Roll Felt Scarfhttps://www.treetopscolours.com.au/more-felting-info-and-supplies/wool-felting-how-to/no-roll-felt-scarf.html.
When the silk hankies begin to show signs of bonding to the fabric (either by seeing wool fibres penetrating through the silk hankies, or if pinched it doesn’t’ move around too much, and possibly some shrinkage has begun) you can take the scarf out of the plastic and start the gentle process of tossing. As you proceed to toss, continually add water and soap. Stop frequently to check that your edges haven’t folded in on themselves. Also begin to stretch your work, gently at first and then more strongly as the wool becomes more felted, this will help to create a better felt.
When you feel your scarf is nearly finished, complete the fulling stage by using a double-cut glass washboard, firm pool bubble wrap or my latest favourite tool a plastic paint roller tray (see Figure 28). The ridges are quite good for fulling as long as you use plenty of warm water and olive oil soap. You should feel as if the scarf is “gliding” across the ridges, not scrubbing. Work on this surface till the felt feels firm and the scarf has shrunk at least 30%.
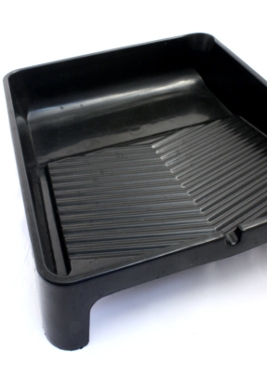
Figure 28
Finally, rinse out all the soap in similar temperature water, don’t shock the wool. Roll your scarf in a towel to remove excess moisture then lay flat to dry, stretching to shape as needed.
After the scarf has been dry for at least 24 hours, I always feel the need to felt it again for about 5 minutes using the washboard or painters tray. I find after the wool has dried, the fibres appear to be more relaxed. What feels really well felted when wet, tends to be less felted when dry. The re-felting process will proceed amazingly quickly.
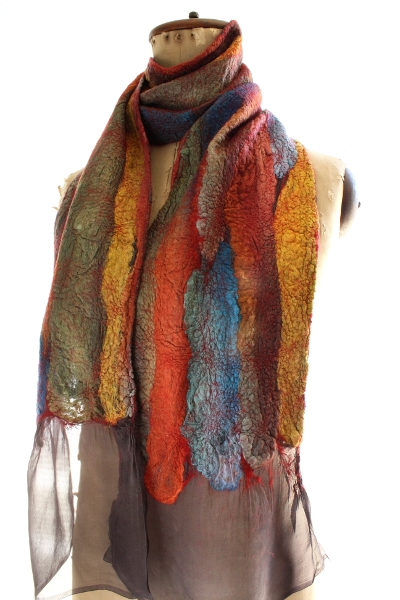
It is extremely important to felt your hankies well. The wool needs to completely penetrate all layers of the silk to keep it in place. If you have used a strong contrast between the wool and the hankies it will result in a lovely marbling effect (see Figure 29).

Figure 29
As a last finishing touch steam iron your scarf to add a more professional look. It will also help bring up the lustre of the silk.[/toggle][/accordion]