
If you were asked what is your least favourite part about felting – most people would answer the ROLLING! Especially if you have any problems with your neck, shoulders, or hands, the rolling can be a painful part of the process. Thankfully a solution has been developed to replace the rolling. You still will need to do complete the second part of the felting process called the FULLING part by hand. These instructions are meant to show you how to replace the first stage of felting – the ROLLING part with using your Tumble Dryer. The instructions are also intended for Nuno felting with superfine Merino wool (19 micron – 17 micron).
Main Points to Remember
- The Tumble Dryer only replaces the ‘Rolling’ aspect of the felting process.
- You will still need to finish ‘Fulling’ your piece by hand after the ‘Rolling’ phase in the dryer.
- It is the ‘thumping” action of the dryer that is doing the felting NOT THE HEAT!
- Not all Tumble Dyers are the same size, and therefore the “dropping distance” will be different. You might take some time to get to know your own dyer by first making a small sample.
Rolling machines versus Tumble Dryers
There has been a revolution in felting equipment in the last 15+ years. There are now several versions of Rolling machines available on the market to the home felt maker. I think they are a wonderful addition to a felt maker’s tool set; however, I haven’t needed to purchase one since I started using my Tumble Dryer (which I picked up for free off the verge because the heating element had stopped working). One of the main differences between the a Rolling Machine verses a Tumble Dryer is that the Rolling Machine applies a much more even and uniform pressure to the felt. Personally, I haven’t found this to be a problem when using the Tumble Dryer, as I like the more ‘hand-made” look that it produces.
You will also find felters who just use electric finishing sanders from start to finish. This is fine if you want to stand there the whole time dealing with noise and vibration. I feel the dryer is just as quick and effective, and once again better for your body in the long-term.
Electric household tumble dryer
Any electric Tumble Dryer should be fine as long as it is not mounted upside down on the wall, in which case the electrics are at the bottom and it’s not a good idea to use it this way since we do use water and it could potentially be a hazard. A small second-hand dryer can be purchased at any cash converter store for very little. We will only use the ‘cool’ cycle. It is NOT the heat of the dryer that does the felting – it’s the ‘thumping’ or dropping action that takes the place of rolling your felt. Because these instructions are intended for use felting using superfine Merino wool we only use a cool dryer. The felting process needs to proceed slowly so that the fibres have time to migrate to create great felt. If rushed (by using a hot dryer) during Nuno felting you risk that the wool might just felt to itself quickly and not to the fabric. Also, you will not have as good a quality of felt, as the fibres need time and encouragement to move and intertwine to create good felt.
Getting Started
For the dryer method we don’t use bubble wrap or a pool noodle/pvc pipe. We will only use two pieces of painters plastic which the wool will be sandwiched between. You will also need two towels and several elastic ties.
Cut your painters plastic around 25-50cm (10-20inches) longer on each end than your project, and around 10cm (4inches) wider on each side than your project.
Now lay down your wool down on one sheet of the plastic. Finish decorating it, then completely wet it out with cool soapy water so there are no dry patches or air pockets.
In Australia, I use a gentle dishwashing soap called Earth’s Choice. Your soap should have a pH between 7 and 9.5 – Google Safety Data Sheet or Material Data Sheet on the exact product’s name and you should be able to find out the pH of your product. I use 1ml of soap to 1 litre of cool/tepid water. Place a net over the wool before you wet it out if you are unsure how to wet out wool without a net. Press down on the wool so that it becomes nice and flat and wet all over.
Now, it is very important to remove excessive water and leave just the right amount of moisture in the wool. I use a micro cloth to do this. Lightly dab the wool until you leave just enough water so that when you push down with your hand you see a bit of moisture glistening between your fingers, but not a “swimming pool” of water. Dab off any excess. It is important not to leave it too dry or too wet.
Next, place your second sheet of painter’s plastic on top, forming a sandwich with the wool in the middle. Smooth all the air bubbles out and fold in all the side edges of the plastic to seal it.
Now roll up a small towel which is the width of your plastic and create a roll about the size of a pool noodle. We will use this instead of using a pool noodle. If the project is small and doesn’t weigh much, I will dampen the towel to add some weight to the bundle.
Next, GENTLY roll your sealed plastic bundle up around the rolled up towel.

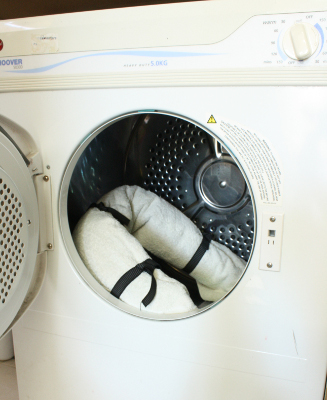
Now, lay out your larger towel and fold in the ends of the towel over the ends of the rolled up plastic, in case water drips out the ends of the plastic roll. Finish rolling the plastic roll up inside the larger towel – it will look a bit like a sausage. Tie off the sausage towel roll several times with 2cm wide elastic ties – more ties is better than less ties.
Now you are ready to place this bundle in your dryer!
Felting in Your Dryer
The fun part starts now, toss the sausage in the dryer, shut the door and turn on COOL setting for 10 to 15minutes. Start with 10 min cycles if you are unsure of your dryer, then progress to 15min cycles. There usually is a Cool cycle right at the top of your dial. It is NOT the heat that will harden your felt but the THUMPING action of the bundle dropping over and over in your dryer. It should sound like you put an old pair of tennis shoes in your dryer, if not then have a look because sometimes the sausage gets wedged, and you need to free it.
After 10 (15) minutes take the bundle out, untie it, check for wrinkles or anything that needs to be fixed, make sure your felt is still damp. Then roll it back up BUT put the damp towel at OTHER END (just as you would when hand rolling with a pool noodle). Roll it up again in the outer towel and tie it off as before. Place in dryer for another 10 (15) minutes; repeat till 30 min has passed.
After 30 minutes, I take it out, unroll the bundle and remove the top sheet of plastic. This top plastic protects the project but it also slows down the felting process (especially great for Nuno pieces). Now I remove it. Also after 30min, it generally needs a light sprinkle. Don’t let you work dry out or it will become fluffy!!
After 45 minutes, I unrolled the sausage and change ends for the rolled up towel inside the bundle, straighten any wrinkles out and sprinkle with water if need be. NOTE: If your felt hasn’t started to shrink and grab the fabric after 45 minutes in the dryer, you maybe using too heavy of painters plastic. Try some thinner plastic. When using even slightly heavier plastic it can effect the felting rate because it doesn’t allow the fibres to move enough.
At an hour, your piece is quite possibly done. The work begins to pull in a little (shrink), or if the fibres have migrated enough for the wool to begin holding together when removed from the plastic. Same as when you are dry rolling. If you continue using the dryer from this point on you risk the possibility of your felt becoming bulkier and not as well constructed; therefore, I advise removing it from the dryer and beginning the fulling process by hand.
Every piece will be different, you will need to respond to what your piece is telling you. It may take 45min or it could take 1hr 15 min…. you be the judge. If you piece is over 2.5 metres (2.7 yards) long or longer, is very wide, or a resist piece. It could take longer. With the longer pieces, at some point I often fold them so the middle section is closer to the outside of the roll. The middle section of the longer pieces often are under felted. Anything on the outside of the roll gets more ‘banging’ and felts faster than the inside of the roll.
As this point you remove the felt from the dryer and finish fulling it by hand using a bar of Olive Oil soap. Note: I have created an entire Zoom recording on How to Fully Full Felt that can be purchased from my website at: https://treetopscolours.com.au/product/fully-fulled-felt/. There is a lot to learn about the fulling side of feltmaking.
The dryer method will replace ALL your rolling but NOT the fulling part of making felt. A smart way to work is to make use of the dryer time and start laying up another project while the dryer is thumping away. It will generally take about as long as it does with rolling by hand, BUT you have done NONE of the rolling!