How to Fully Full your Felt – Instructions for making the best possible felt using Superfine Merino tops
To understand how to make great felt you must first understand the basis mechanisms of why wool felts and the different stages of feltmaking. Start by reading the following article to begin your journey in becoming a great feltmaker!
Felt is a non-woven fabric created by the entanglement of wool fibres. Only wool and other similar protein fibres like alpaca and mohair have felting properties. Wool fibres can felt together because their surface is made up of over-lapping scales which are smooth in one direction and rough in the other. When the wool is agitated in an environment with the right amount of heat, moisture, vibration and pressure the fibres can only move in one direction thereby causing them to permanently entangle. Heat and moisture swells the wool fibres, raising their surface scales and helps the fibre be more supple thereby enabling them to move easily and lock together into a compact mass.
Other factors are also important in making a felt, particularly the curliness or ‘crimp’ of the fibres, which makes them act like a corkscrew when they are vibrated. During felting they twist around each other and entangle. The fibres having the most crimp giving the tightest felt. It is interesting to note that the superfine merino has the most ‘crimp’ of all sheep breeds.
The softness of the felted garment comes from the quality (micron) of the wool and not from the amount it is felted. Many beginners make the mistake of stopping the felting process too soon because they like its ‘softness’, but unfortunately all they have really created is a pre-felt, a very under-felted piece of felt that will pill and look shabby quite quickly.
The felting process is divided into two stages – Hardening (often referred to as the Rolling Stage) and Fulling.
Stage 1: Hardening (Rolling) Stage
The Hardening stage begins after the wool is laid down on top of thin plastic (or bubble wrap) and wet out with water and soap. Be sure your soap has a gentle pH no higher than 9.5 or no lower the pH 6. For large areas of wool it is easier to use Earth Choice Dishwashing liquid (by Nature’s Organics). We recommend combing 1ml of dish liquid to 1 liter of tepid-cold water in a spray bottle. Once the wool is fully wet, you can begin the rolling process OR replace the rolling by putting your piece in the tumble dryer. Be sure to read our full instructions on “No Roll Felting in Dryer click here to fully understand this method.
Continue rolling until the fibres begin to hold together just enough to be considered a pre-felt. If pinched the fibres will easily pull away (Figure 1) but are beginning to hold together. The felt will have shrunk only slightly in this stage. This generally takes about an hour +/-. I roll in 15 minutes segments, changing ends and turning work if possible.
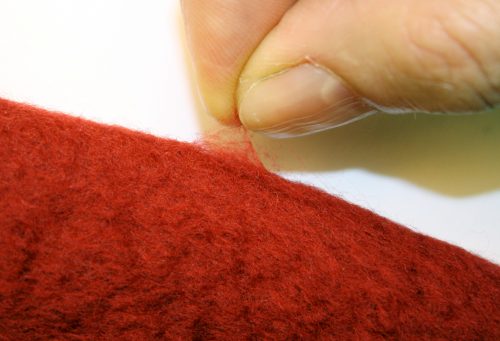
Figure 1
In the Fulling stage I use both tossing, washboard (a corrugated surface) and rolling pin methods.
Stage 2: Fulling by Tossing, Corrugated surfaces and Rolling Pin
After removing the pre-felt from the plastic, begin tossing – lifting the wool in the air and dropping it on the table (Figure 2) maybe 10-20 times. At the start be gentle, try and think about getting air into your felt. As the felt begins to firm, continually open it up to be sure none of the edges are felting together – edges need LOTS of attention especially right as you start the fulling process. You will also need to begin to stretch your felt after each round of tossing. The stretching keeps the fibres from bulking up and allows the felt to become more fully felted. Remember to keep the wool wet and soapy while tossing. I this stage I always use a bar of olive oil soap to keep my hands and the work feeling slippery – like the feeling of a chamois cloth. Use plenty of water it will add weight to your bundle so it drops more effectively with a thud and a slight splash. Continue tossing and stretching and begin GLIDING across some type of pool bubblewrap until the fibres are reasonable are well on their way to shrinking. Shrinkage is an integral part of fully felted felt! Remember LOTS of water and soap so its slippery and GLIDES across the surface of the bubble wrap.
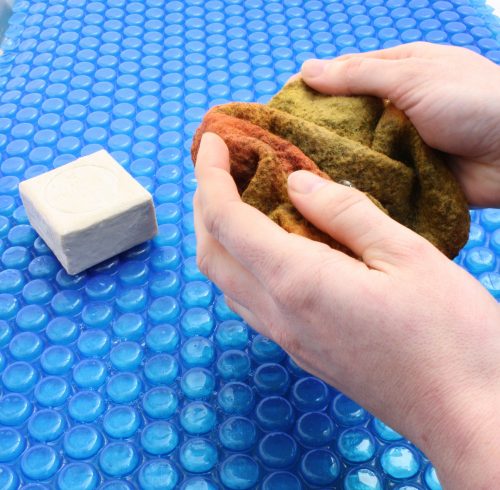
Figure 2
Fulling with various Equipment
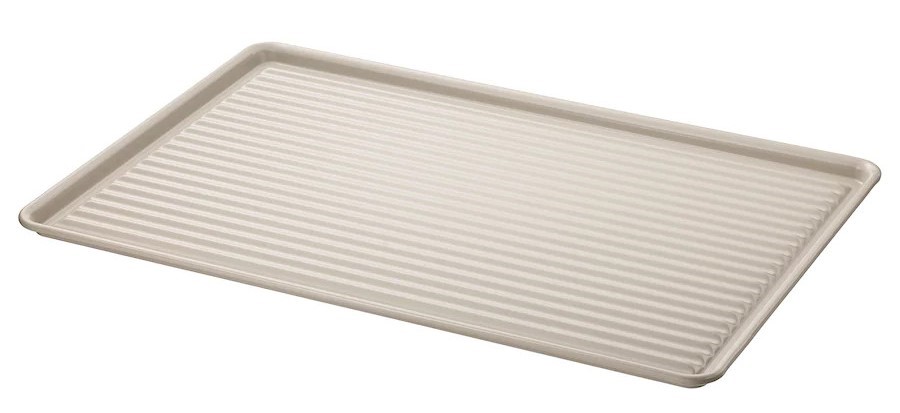
To further full your wool (after the initial tossing stage and gliding over the firm pool bubble wrap) by gliding the felt with your fingertips over a smooth corrugated surface. A beautiful well fulled felt can be achieved using the following tools. My favorite currently is a metal dish drain tray from Ikea – it’s both a corrugated surface and a tray which captures the excess water that can re-used, and your work surface doesn’t get wet because the water is held in the tray. See Figure 2A at the very bottom this article. Product number from Ikea is 604.301.58. I also like the ridges on a double-cut glass wash board (Figure 3). Another tool to use is a plastic painter’s tray which holds the water and has a corrugated surface (Figure 4). Some painter’s tray has very few ridges, make sure you purchase one that has LOTS of deep rounded ridges!
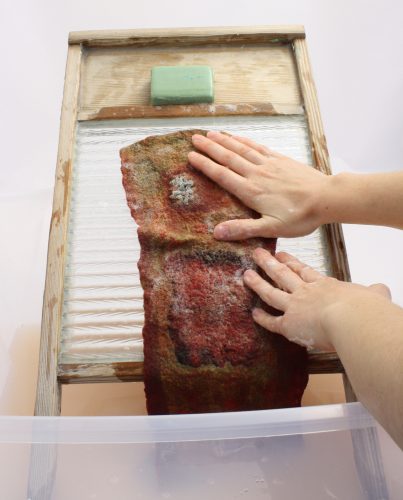
Figure 3
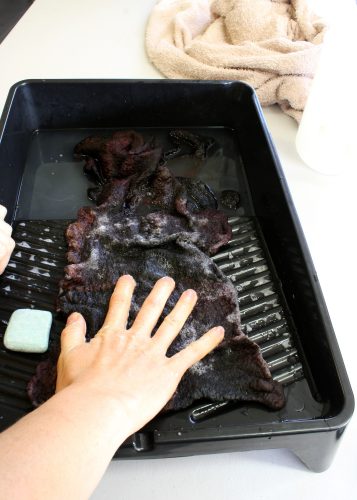
Figure 4
Simply glide the work over the ridged surface (don’t SHRUB!) with the aid of lots of soapy water. If your felt does not easily glide over the surface, you are not using enough soap or water. Work in a container to keep water and soap close at hand. If your felt is too dry and not well lubricated the fibres the surface will become fuzzy.
If you still need more fulling, especially on handbags, slippers and purses you can purchase a cutting board from IKEA (Figure 5) and use the corrugated backside. This board is even more aggressive, so be gentle and use LOTS of soap and water. It will be difficult to use these more aggressive ridges if your felt is not firm enough.
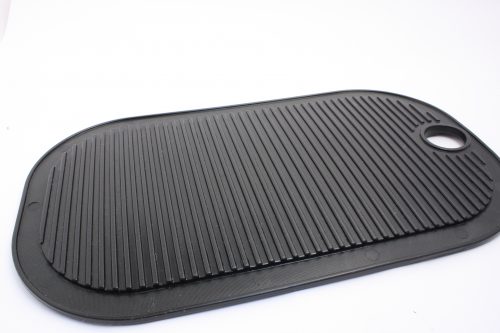
Figure 5
It can also be useful to work inside a large plastic oil drip tray (Figure 6) or washing machine drip tray. This way you can work large areas at a time and easily retain the soap and water. I love my tray and never work without it!
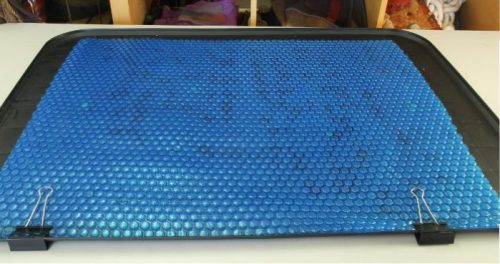
Figure 6
A rolling pin is also a very useful fulling tool. Heavy rolling pins will compact the fibres extremely well without having to put in too much effort. This is important for good felt! Much of our Nuno felt is too spongy and airy which leads to pilling. If you don’t have a special fancy rolling pin for felting (sometimes I feel these fancy surfaces are not right for superfine Merino). I am very happy with a simple plane wooden rolling pin (the ones where the handles roll are especially ergonomic for your hands). Marble ones are also very good cause they are so heavy.
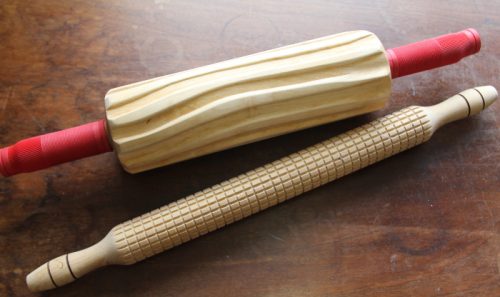
Figure 7
When using any of these fullling tools shrinkage will occur in the direction that you are gliding, turn work frequently – use this technique to specifically shape an area as needed. When you gently gliding the felt over these textured surfaces it compacts the fibres considerably more than tossing so expect more shrinkage. The results should be a smooth tight surface perfect for wearables where constant rubbing can result in the relaxing and pilling of fibres.
- Have you FULLED your felt enough?? One of the most common mistakes is to not fully felt your felt (Figure 8). These samples are from the same piece of Nuno felted Silk Mesh (Snowy Owl colourway) and superfine Merino tops (Black Pearl). Sample on the left has NOT been fulled enough – it will eventually pill and loose shape. Sample on the right has been fulled three times to reach the best results. Shrinkage was 60%, 6gms grams of wool was used in 50cm x 50cm. This created a superfine Merino (18.5micron) lightweight nuno felted cloth which weighs 24gms per metre square.
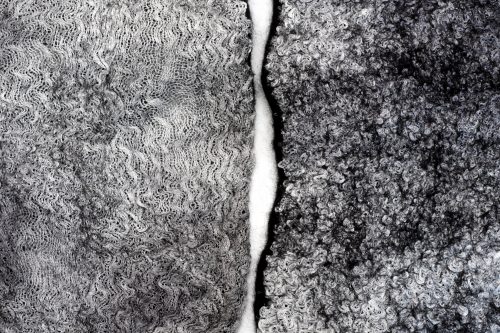
Figure 8 Nuno felted Silk Mesh sample on right is under felted. Sample on right is fully felted.
- Often it is hard to fully felt your felt in one go. These days I do the best I can to full my piece after the rolling, but then I let it dry and re-felt it the next day (or minimum let it rest for several hours) and then and let it dry or rest and re-felt it a third time. Once the wool has had time to dry and recover, it is easy to finish fulling it really quickly with a bit more tossing and washboard work. It’s worth the bit of extra time and effort!!!
- Many people believe if your wool is fully felted it will lose its softness. Softness depends on the micron count of the wool (14-19 micron wool being the best for wearables next to the skin). If you are not used to fullling wool this fully, the result of your first attempt may end up too thick and a bit stiff. This is because there has been more shrinkage than you are normally used to. The easiest remedy is to start with less wool in the initial laying out stage, this way when its fully felted felt it will not feel too thick or stiff. Be sure to allow for 45%-65% shrinkage!! A must!!
- Figure 10: As a rule of thumb for a light-weight Nuno cloth lay-out I use 20-25gms of superfine Merino wool tops in 1 metre square of fabric. Shrinkage was 60%
- Figure 11: For medium-weight cloth (good for making light weight clothing) use 40-50gms of superfine Merino wool tops in 1 metre square of fabric. Shrinkage was 50%
- I don’t try to be too perfect or precious with the lay-out, mostly notice how much space is left between the fibres, you can clearly see through the wool to the table below. This will create a lightweight nuno felted cloth.
Figure 10 Laying out wool for light-weight Nuno Silk Mesh. Use 20-25gms superfine Merino wool tops per metre square.
Figure 11 Laying out wool for medium-weight Nuno Silk Mesh cloth. Use 40-50gms of superfine Merino wool tops per metre square.
If your felt feels coarse or scratchy when it is fully felted, then usually one of the following things has happened.
- Have you rubbed or tossed the felt without adequate lubrication (olive oil soap and cold-warm water)?
- I recommend only using soaps with a pH between 6 and 9.5
- Have you shocked the wool by changing water temperature too dramatically? Don’t pour hot water over cold felt, warm up your felt slowly first with warm water.
- Have you used boiling water in the felting process? On fine or superfine wools I never use boiling hot water unless I’m making a 3-D sculpture.
- Have you microwaved the wool too long and it comes out so hot you can’t handle it, that is too hot! I DO NOT recommend using the microwave at all!! It is too unpredictable and often over heats your wool or silk.
- Overheating silk fibre or fabric can cause it to loose its lustre and strength. NEVER heat any silk over 185 F or 85 C.
- Overheating silk can also pull dye off unnecessarily. Dye molecules do not bond to silk with the same strength as they do to wool fibre.
- Things you should NOT do to your Silk Nuno while felting! (materials: silk mesh and superfine merino) (Figure 10)
Sample on left has lost luster and colour compared to sample on the right.
1. Never microwave your work, ever….!
2. Never “scrub” or “toss” your felt without sufficient soap and water. -
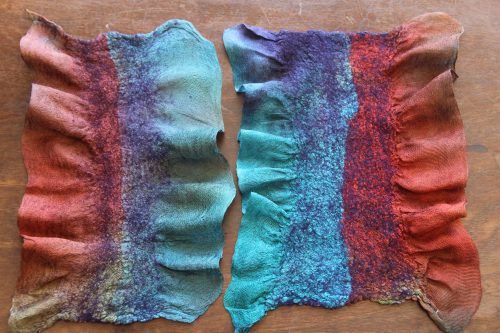
Figure 10 Silk Mesh sample on left has lost colour and lustre due to being microwaved, harsh soaps and lack of abundant water and soap during fulling process.
 Fully Felted Nuno