
Instructions for Ten Hanky Neck Wrap by Nancy Ballesteros
At the end of June 2013, FeltWest had its annual retreat at Muresck Agricultural College in Western Australia. I was asked to demonstrate how to work with silk hankies. After the quick demo, the group leapt into action, and the results were not short of amazing. I love the process of sharing creative ideas, and in return even more creativity is released. Two women in particular, Lindy Frayne and Judy Barkla took working with the silk hankies to a new level of creativity. Below I would like to share some of their idea and a few more of my own.
[accordion]
[toggle title=”More Tips for Working with Silk Hankies”]
• Lay down slightly more wool on any thicker areas of the hankies, ie the edges, any over lapping areas, etc.
• Sometimes there is really thick area on the hankies where the cocoons were attached to the tree, remove this by thinning it out with your fingers or simply remove by pulling the lump completely out of the hanky.
• Be sure and roll long enough to enable the fibres time to migrate thoroughly through the silk before starting the tossing phase.
• Acquire a glass washboard or painters tray for the final fulling stage.
• Let your scarfs rest and dry overnight, then felt it again by gliding the scarf across the washboard with lots of soap and water (no scrubbing… think about glidding) for a short period of time, this will really help create quality felt.
• Enjoy the organic nature of the hankies, don’t worry too much that they aren’t all exactly the same shape or thickness.
• Iron, iron, iron – if those loose threads keep catching on everything, or your hankies are messy. • Use talc powder or kitchen gloves if you have really rough hands
[/toggle]
[toggle title=”Ten Hanky Neck Wrap – Materials List”]
This small neck scarf is made with only ten hankies (or 20 hankies if you would like to cover the backside as well) and a bit of wool. It is very easy and straight forward. The scarf moulds beautifully around your neck and showcases the interesting texture of the silk hankies.
Felting Materials
10 -15 gms (.35 – .53 ounces) Superfine Merino Wool Tops. The wool can be a contrasting OR similar colour to the silk hankies – your choice. Personally, I choose to a strong contrasting colour so the marbling effect of the wool is more effective.
30 gms (28 ounce) Silk Hankies. Use this weight for decorate only ONE SIDE of the scarf with silk hankies and wool on the other. Personally, I always prefer to decorate both sides of a scarf with hankies.
60 gms (1.4 ounce) Use this weight for decorating BOTH SIDES of the scarf with silk hankies. You can choose to design with different coloured hankies or use all the same colour – your choice.
General Requirements
Bubble Wrap – longer and wider than the scarf you will be making
2 PVC Poles or Pool Noodles – as wide as the bubble wrap
2 Painters Plastic Drop Sheets – the same size as bubble wrap
Non-Slip Matt – to put under project when rolling so it won’t slide around
Watering Jug or old milk bottle with small holes in the lid for wetting out your project
Plastic Painter’s Tray, glass washboard, or hard pool bubble wrap for fulling your work
Netting Iron Grease proof paper – place on ironing board so the silk hankies won’t stick to it.
Olive Oil Soap
Old towels
If you need a more detailed set of basic felting instructions please see our website athttps://www.treetopscolours.com.au/more-felting-info-and-supplies/wool-felting-how-to/no-roll-felt-scarf.html.
[/toggle]
[toggle title=”Directions for Felting”]
Place the bubble wrap on top of your table, bubble side down. Next place one piece of painter’s plastic on top of the bubble wrap and then lay down your fabric on top of painters plastic. I usually sandwich my work inside two sheets of painter plastic allowing me to easily flip it and design on both sides of the scarf. I believe scarves look better if both sides have been thought about.
Next, peel off a thin layer of hankies (try for only one or two in thickness see Figure 1). To ease frustration with handling the hankies, I set myself up at the ironing board (cover with great proof paper if hankies stick to your board) for this step and do all 10 hankies (if you’re only decorating the front side) or 20 hankies if you’re decorating both sides. Before you iron the hankies, take this time to work out any really thick areas, removing any thick cocoon like areas if need be. Also, thin out the edges a bit. Re-organize the shape if needed, then iron.
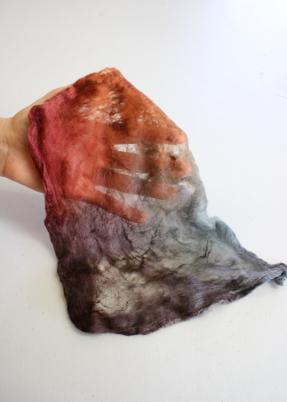
Figure 1

Figure 2

Figure 3

Figure 4
Now lay down all ten hankies on top of the bubble wrap and sheet of painters plastic. Slightly overlapping the edges of each hanky, or if necessary you can overlap the edges more but be sure and add a touch more wool to these areas (see Figure 2).
Cover all the hankies you have just laid down with a thin layer of wool in two directions. Be sure to lay down more wool on the edges and any thicker areas (see Figure 3).
If you are using the silk hankies only on one-side and with wool on the backside, you are now ready to cover it with netting so that you can wet it out with soapy water.
If you are decorating two-sides with the silk hankies, cover the wool with painter’s plastic; roll up around your PVC pipe and flip. Un-roll the bundle and remove the top layer of painter’s plastic so that you can place the other ten hankies along the backside (see Figure 4). When all the hankies have been laid down, cover with netting.
The next step is to sprinkle with soapy water. I use an old milk bottle which has been made into a water can by pocking a hot needle into the cap many times. Grate a couple of tablespoons of olive oil soap into a jug, add boiling water to melt, top up with cold water and pour into your milk bottle. Now sprinkle soapy mixture over the scarf and rub until the silk is thoroughly wet – especially the thicker edges. Now cover the wet scarf with painters plastic or simply leave it off and roll up the scarf in the bubble wrap around the pvc pipe. Lastly, roll this bundle in an old towel to catch any drips and place on top of your non-slip matt to begin the rolling phase.
The felting process is divided into two stages – hardening (rolling) and fulling (tossing and washboard). I generally roll my scarves for around 20-30 minutes (approximately a 1000 roles or more), continually changing ends from which I roll and occasionally adding more water as needed to keep the work moist. If you don’t like to roll try using the tumble dryer to do the rolling part for you. Find complete ‘No Roll Felt Scarf’ instructions on the Treetops website https://www.treetopscolours.com.au/more-felting-info-and-supplies/wool-felting-how-to/no-roll-felt-scarf.html.
When the wool begins to show signs of migrating through the hankies or possibly some shrinkage has begun, you can take the scarf out of the plastic and start the gentle process of tossing. I like to use the plastic painter’s tray to work in. I can add water to the bottom tray and have my bar of soap handy (see Figure 5). As you proceed to toss, continually add water and soap to your felt. Stop frequently to check that your edges haven’t folded in on themselves. Also begin to stretch your work, gently at first and then more strongly as the wool becomes more felted, this will help to create a better felt. Also, I knead my wet soapy felt with both hands (like in making bread) to help in the fulling process.
When you feel your scarf is nearly finished, complete the fulling stage by using the ridges on the painter’s tray. The ridges are quite good for fulling as long as you use plenty of warm water and soap (see Figure 6). You should feel as if the scarf is “gliding” across the ridges, not “scrubbing”. Work in this manner till the surface of the felt feels firm and the scarf has shrunk approximately 30% – 40%.

Figure 5
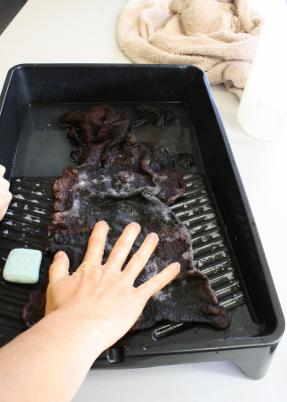
Figure 6
Finally, rinse out all the soap in similar temperature water, don’t shock the wool. Roll your scarf in a towel to remove excess moisture and lay flat to dry, stretching to shape as needed.
After the scarf has been dry for at least 24 hours, I always feel the need to felt it again for about 5 minutes using the washboard or painters tray. I find after the wool has dried, the fibres appear to be more relaxed. What feels really well felted when wet, tends to be less felted when dry. The re-felting process will proceed amazingly quickly.
It is extremely important to felt your hankies well. The wool needs to completely penetrate all layers of the silk to keep it in place. If you have used a strong contrast between the wool and the hankies it will result in a lovely marbling effect.
As a last finishing touch steam iron your scarf to add a more professional look along with bringing up the lustre of the silk.
[/toggle]
[/accordion]

